How to Launch a DoS Attack by using Metasploit Auxiliary

In this tutorial, we are using Metasploit Auxilary SYN Flood to launch the attack “auxiliary/dos/tcp/synflood” .

SYN flood

It is a type of DoS attack which use to send a huge amount of Sync to consume all the resources of the target system.

Let’s start by launching Metasploit by simply typing msfconsole in your terminal Window. It will take a couple of minutes to launch the console.

Then use the select the auxiliary “auxiliary/dos/tcp/synflood” by typing the following command.

msf > use auxiliary/dos/tcp/synflood

Once the auxiliary got loaded type show options to list all the options with the auxiliary. you can define the settings as per your convenient.

Then you should setup RHOST and RPORT which is the target address and the port numbers respectively.

Then to Launch the attack just type exploit, so that sync flooding will start, we placed Wireshark in the target machine to show how many packets hit the machine.

We can see around 127252 packets captured within minutes after the attack launched.

Using ID Serve to footprint a Website

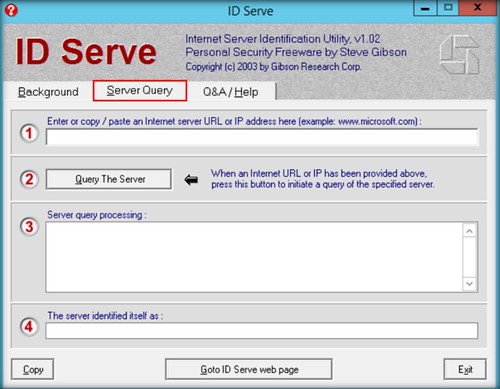
  1. Open ID Serve, if there is a security warning pop up appears, click run to proceed the program. Main ID Serve main window will show up, click server query tab

Screen Shot 2018-05-28 at 21.19.07

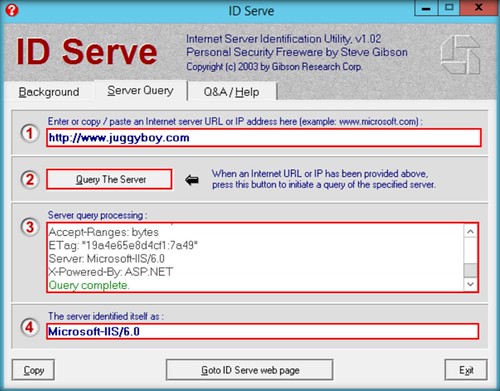
2. Enter the URL for this example will be www.juggyboy.com then click the ‘ Query The Server ‘

Screen Shot 2018-05-28 at 21.19.26

3. From the result, the attacker can analyse the vulnerability on the version that ID Serve succeed to footprint

Installing Kali Linux Step by Step

Before we begin to install Kali Linux on VirtualBox download Kali Linux and Virtual Box according to your System architecture(64bit or 32bit) and OS(Windows, MAC, or Linux):

how to install kali linux on virtualbox

how to install kali linux on virtualbox

  • Oracle VM VirtualBox Extension Pack for All supported platforms → Get it now

how to install kali linux on virtualbox

Extension pack provides the following added functionality:

  1. The virtual USB 2.0 (EHCI) device.
  2. VirtualBox Remote Desktop Protocol (VRDP) support.
  3. Host webcam passthrough.
  4. Intel PXE boot ROM.
  5. Experimental support for PCI passthrough on Linux hosts.


Step 1: Install virtual box on your PC.

The installation process of VirtualBox is simple just open the setup you downloaded earlier and click next leave everything as default till finish.

how to install kali linux on virtualbox

Step 2: Create the virtual machine to install Kali Linux.

Start the virtual box and follow these steps to create the virtual machine:

  • Click on the New option at the top

how to install kali linux on virtualbox

  • Name your OS i.e Kali Linux and choose type as Linux, select the version 64bit or 32bit must same as the kali Linux ISO you have downloaded click Next.

how to install kali linux on virtualbox

  • Choose your Memory size i.e Ram size must be equal or greater than 1024 MB which is equal to 1 GB.

how to install kali linux on virtualbox

  • Create a hard disk for your virtual machine.

how to install kali linux on virtualbox

  • Choose your Hard disk file type as VDI(Virtual Disk Image)

how to install kali linux on virtualbox

  • Choose Dynamically allocated

how to install kali linux on virtualbox

  • Set your Hard disk size 20 GB or greater, and click on create.

how to install kali linux on virtualbox

Your Virtual machine is ready to install Kali Linux.

how to install kali linux on virtualbox


How to install Kali Linux on Virtualbox

Follow these steps to install kali Linux on your newly created virtual machine:

  • Click on the settings options
    How to install Kali Linux on Virtualbox
  • (1)Choose storage (2)choose Empty (3)Click on DVD icon next to IDE Secondary Master (4) Choose a Virtual CD/DVD disk file, Which is the Kali Linux ISO you have downloaded. Click Ok.

How to install Kali Linux on Virtualbox

  • Click on the start button to begin the kali Linux installation on your virtual machine

How to install Kali Linux on Virtualbox

  • Choose Graphical Install, because it is easy to use.

How to install Kali Linux on Virtualbox

  • Choose your Language and click contineue.

How to install Kali Linux on Virtualbox

  • Enter a host name.

How to install Kali Linux on Virtualbox

  • I have to skip some parts because they are very simple just leave them default and click continue until you reach here to choose your password.

How to install Kali Linux on Virtualbox

  • I have to skip some parts just leave them default choose continue until you reach here. Choose Guided- use entire Disk and click contineu.

How to install Kali Linux on Virtualbox

  • One step has been skipped just choose default and click continue until you reach to select partition Scheme. Choose All files in one Partition because it is recommended for the beginners.

How to install Kali Linux on Virtualbox

  • Choose Finish and click Continue.

How to install Kali Linux on Virtualbox

  • Choose Yes and click continue to start the installation process.

How to install Kali Linux on Virtualbox

  • Wait till the installation gets done.

How to install Kali Linux on Virtualbox

  • After the installation gets done you have to Remove the Kali Linux ISO image. Go to settings and choose storage under the Controller: IDE click on Kali-linux-2016 and choose Remove Attachment. This step is very important otherwise, the installation will restart.

How to install Kali Linux on Virtualbox


Now you a have your own virtual machine loaded with kali Linux don’t forget to install the Oracle VM VirtualBox Extension. If you face any problem or don’t understand any step in this how to install kali linux 2.0 in VirtualBox guide  feel free to ask in the comment we reply to every question related to how to install kali linux on Virtualbox windows 10